You should be conscious of the categories of thermostat before planning to wire a thermostat. Now a days, most of the homes have an HVAC system with Furnace & Air Condition Outlet. And the wiring of these devices is almost same. In contradiction, some homes may have a system that is not similar. For example, Heat Pump System is one of them. In that case, wiring procedure of your thermostat will be different also.
A WiFi thermostat generally has five types of wire. Those are (RC-Red Wire-power 24 vac), (RH-Red wire jumper – power 24 vac), (W-White wire – for heating), (Y-Yellow wire-for cooling) & (G-Green wire-controls fan On-auto). But this code is not unique for all types of device.. It can be vary from system to system and so it is very confusing also. It is better to appoint someone who has specialized knowledge regarding HVAC system if you think that you do not have clear knowledge & many doubts of that types of HVAC. By doing so, you can keep intact many future expenditures.
There are also some steps that should be observed strictly. Those are mentioned below:
It can be finalized that the problem that is usually faced by most of the people is dealing with those multi types of color wire & the terminal. Even the expert technician also faces this hindrance. In that situation, your instincts knowledge & IQ will aid you in solving that puzzle . The expert can easily cross over that hurdle as he is used to installing numerous thermostats in every week or in month. But in comparison to him, we the general people may work with one or two thermostat in one or two year.
A WiFi thermostat generally has five types of wire. Those are (RC-Red Wire-power 24 vac), (RH-Red wire jumper – power 24 vac), (W-White wire – for heating), (Y-Yellow wire-for cooling) & (G-Green wire-controls fan On-auto). But this code is not unique for all types of device.. It can be vary from system to system and so it is very confusing also. It is better to appoint someone who has specialized knowledge regarding HVAC system if you think that you do not have clear knowledge & many doubts of that types of HVAC. By doing so, you can keep intact many future expenditures.
There are also some steps that should be observed strictly. Those are mentioned below:
- Secured Staring : Use a circuit breaker box & disconnect the connectivity of electricity to your thermostat while starting the wiring task. If you do not so, you might face any problem while wiring. So “Safety First” slogan should be followed without any compromising.
- Pull Away The Old Thermostat : Most of the thermostats have a wall socket plate that can be casted off by pulling it up. But do not do that. You should screw driver to loose it and pull the outlet from wall. But be serious in doing so as there has a linkage of wires with electricity.
- Sealing Wires With Best Accuracy : As there has a linkage of wires with electricity, it is mandatory to mark every single wire. There have color coding for each color of wires. But it is very exceptional that those list may not aid you & in that case you should lebel it by the instincts quality. A details list of these color coding is given at the end of second paragraph of this article.
- Breaking Up The Connectivity Of The Cables : Pull the wires out with much carefulness & attach every pieces of wires with the wall so these do not mingle with each other. If you create hindrance in their movement by sticking them to wall, you can do work smoothly.
- Placement Of a New Wall Plate : Try to place the new wall plate in the same place of old one. This should be in the same place as placing it in a new place may lessen the beauty of the wall as well as closet. The size and shape may not be same as old one. In that case, some new holes could be drilled to adjust the new one.
- Ensure Wiring of The New Thermostat : The wiring system of all thermostats is almost similar in spite of being varieties types of model. There have five wires of different color along with five terminals. The wiring task is very simple indeed. It just to make the connectivity of the perfect wires with perfect terminals & make sure that the padlock is tight enough.
- Place The New Thermostat To The Plate : After being confirmed that all the wires are adjoined, you should conjoin the new thermostat the plate attached in the wall. Now you can check more to make sure that each & every functions are ok. If it is does not work well, please check all the connections again. Bad performance can be occurred due to loose connections an d wrong connections.
It can be finalized that the problem that is usually faced by most of the people is dealing with those multi types of color wire & the terminal. Even the expert technician also faces this hindrance. In that situation, your instincts knowledge & IQ will aid you in solving that puzzle . The expert can easily cross over that hurdle as he is used to installing numerous thermostats in every week or in month. But in comparison to him, we the general people may work with one or two thermostat in one or two year.
The following is a chart showing the most common terminals and their respective color codes
and what that particular wire is used for in the circuit. Now most thermostat's will not have all of these termination points but the chart will help you determine color code and connection points for your particular unit.
The diagram below shows how a basic 4-wire thermostat is connected as indicated by the color code chart above. The basic Heat + A/C System thermostat typically utilizes only 5 terminals.
- RC - Red Wire (Power 24 Vac)
- RH or 4 - Red Wire Jumpered (Power 24 Vac)
- W - White Wire (For Heating Enable)
- Y - Yellow Wire (For Cooling Enable)
- G - Green Wire (Controls Fan ON-Auto)
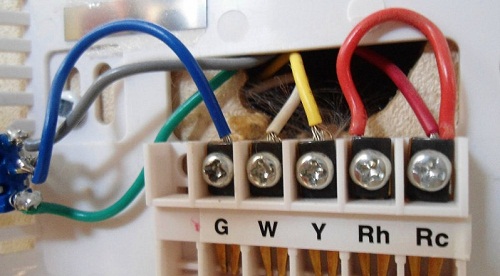
The diagram shows how the wiring works. However your connections may seem a little different on the thermostat itself. Just take a look at the picture below the diagram. The RED wire or 24 Vac power lead is connected straight to the RC & 4 terminals. Some thermostat units have a dedicated R terminal and it jumpers to the RC, RH or 4 terminals internally. The W, Y and G terminals should be pretty straight forward on most all types of thermostat's.
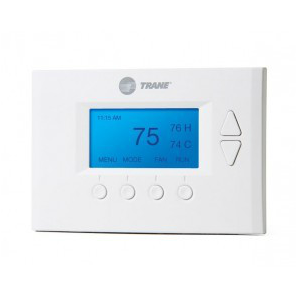
The following image is one of the most popular scenarios today. This type thermostat is relatively easy to connect or change over to a programmable type thermostat. As mentioned in the previous paragraph, the only difference might be the lack of an "R" connection.
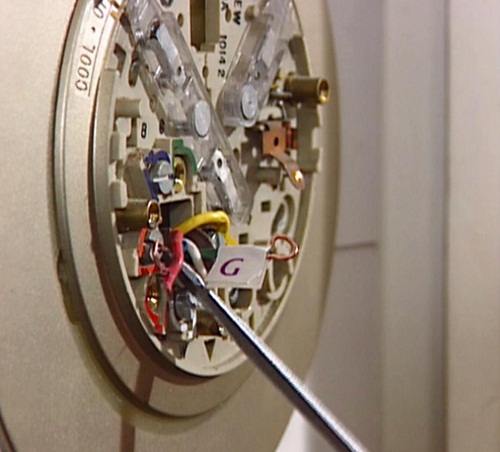
Now the following image here represents a heat pump system thermostat. These types systems are more involved because of the components associated with the system. Color codes may be different from one household to another, but generally the concept should be the same. It's going to take a little research on the owners part to declare what is involved with your heat pump system and verify proper color codes. If your changing a heat pump system thermostat to a programmable thermostat, be sure that the new thermostat is compatible with your style of system. Once that is verified, the owners manual should be informative enough to complete the change over very easy.
Be sure to check out my Thermostat Store for great bargains on all types of thermostats.
A programmable thermostat can save you as much as 60% off your heating bills. I know it for it a fact.
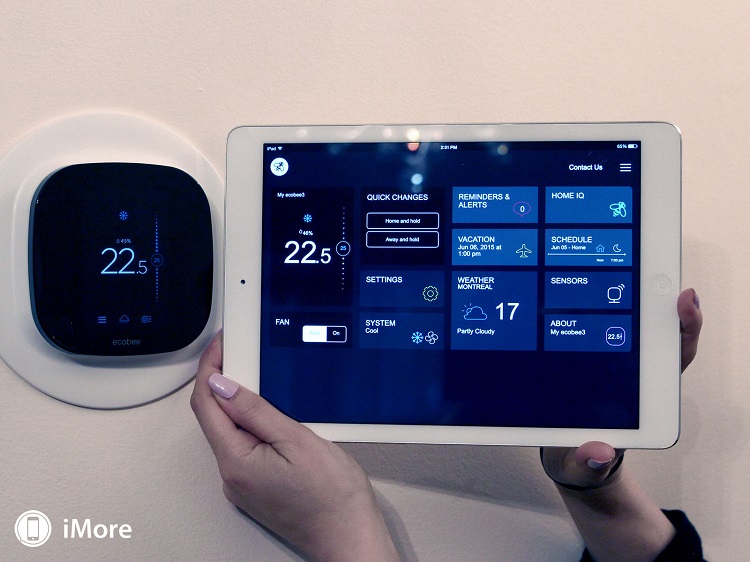
It’s time to set up something “smart” to help you control the temperature in your house. Have you ever heard about a Wifi thermostat? Do you know that this device can help you adjust the temperature according to your desire as well as learning your preference in controlling the temperature? It can be said that this smart device can support you a lot of things in saving your budget as well as saving much energy in cooling or heating your empty house. Or in case that you get one in your home, and you want to replace it because it’s too old.
Before guiding you to wire the new thermostat, ensure that you understand that this is for an A/C unit and furnace and not for a heat pump system. Keep in mind that the heat pump system needs to be wired in a different way. Time to follow us and consult ways for wiring a thermostat.
The following image is one of the most popular scenarios today. This type thermostat is relatively easy to connect or change over to a programmable type thermostat. As mentioned in the previous paragraph, the only difference might be the lack of an "R" connection.
Now the following image here represents a heat pump system thermostat. These types systems are more involved because of the components associated with the system. Color codes may be different from one household to another, but generally the concept should be the same. It's going to take a little research on the owners part to declare what is involved with your heat pump system and verify proper color codes. If your changing a heat pump system thermostat to a programmable thermostat, be sure that the new thermostat is compatible with your style of system. Once that is verified, the owners manual should be informative enough to complete the change over very easy.
Be sure to check out my Thermostat Store for great bargains on all types of thermostats.
A programmable thermostat can save you as much as 60% off your heating bills. I know it for it a fact.
It’s time to set up something “smart” to help you control the temperature in your house. Have you ever heard about a Wifi thermostat? Do you know that this device can help you adjust the temperature according to your desire as well as learning your preference in controlling the temperature? It can be said that this smart device can support you a lot of things in saving your budget as well as saving much energy in cooling or heating your empty house. Or in case that you get one in your home, and you want to replace it because it’s too old.
Before guiding you to wire the new thermostat, ensure that you understand that this is for an A/C unit and furnace and not for a heat pump system. Keep in mind that the heat pump system needs to be wired in a different way. Time to follow us and consult ways for wiring a thermostat.
7 basic steps to wire a new thermostat for your house
Step 1 – Begin with security
Before starting anything, use a breaker box and shut down the electricity to the thermostat because you have to encounter live wires. Starting with safety is the first important thing, remember.
Step 2 – Take the original thermostat away
Almost the thermostats have a wall plate that can usually be discarded by sliding it up. Well, use the screws to open it and take the unit off the wall. Be serious and cautious when eliminating the thermostat from the wall because the wires are still linked.
Step 3 – Mark everything
While the wires are still linked, you need to label accurately where each wire is. It’s commonly accepted that color coding for each wire is prevalent, but sometimes it is not. Therefore, the best way is to label the wire following your instincts.
A normal HVAC system will include some terminals as 24VAC common (black), 24VAC for heat (red), 24VAC for cool (red), 24VAC transformer (red), colling (yellow), switched power for heating (white) and switched power for fan (green). They should be seen behind the thermostat.
Step 4 – Detach the wires
You need to pull the wires out carefully and stick each one to the wall to avoid letting these wires tumble down the wall. Just stick them so that they can’t move.
Step 5 – Place a new wall plate
Please twist in the wall plate in the same place as the last one. The shape and size might be a little different, so try to drill some new holes. In case that you end up drilling new holes, ensure that they are flat.
Step 6 – Wire the new thermostat
Although there are different models, thermostat wiring is still the same. It’s because you have each wire sticked and marked, it’s simply an issue of matching them up to the correct terminal. Step by step, link each wire to their suitable terminals and avail the labels you made previous. Ensure each one is locked tightly. Then put the wiring back to the wall and sometimes that can unbind a poorly locked wire.
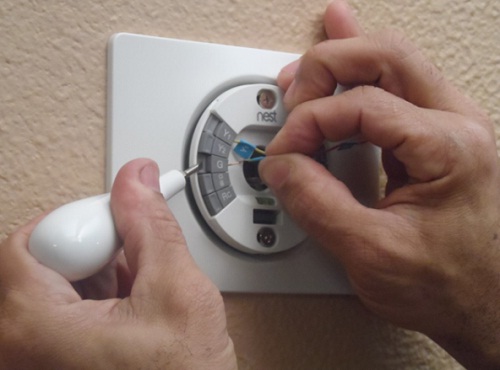
Step 7 – Connect the new thermostat to the plate
When all the wires are linked, please connect the new thermostat to the wall mount and turn on the electricity. After that, check to ensure each function is working correctly. Otherwise, it’s likely a wire is not tight or is linked to the wrong terminal.
What are you looking for? Time to renew your old thermostat with a new one by studying our clear guidance.
You should know that even the most experienced people who relish DIY might come across troubles with wiring a thermostat. The major problem is that you need to deal with those different colored wires and know which one does what and if that were not enough, you should have letters and numbers to solve. However, with lots of thermostat on the market, people tend to be confused because they don’t know which system needs to equip a “c-wire”. In order to help you understand more, please take a look below now.
While the wires are still linked, you need to label accurately where each wire is. It’s commonly accepted that color coding for each wire is prevalent, but sometimes it is not. Therefore, the best way is to label the wire following your instincts.
A normal HVAC system will include some terminals as 24VAC common (black), 24VAC for heat (red), 24VAC for cool (red), 24VAC transformer (red), colling (yellow), switched power for heating (white) and switched power for fan (green). They should be seen behind the thermostat.
Step 4 – Detach the wires
You need to pull the wires out carefully and stick each one to the wall to avoid letting these wires tumble down the wall. Just stick them so that they can’t move.
Step 5 – Place a new wall plate
Please twist in the wall plate in the same place as the last one. The shape and size might be a little different, so try to drill some new holes. In case that you end up drilling new holes, ensure that they are flat.
Step 6 – Wire the new thermostat
Although there are different models, thermostat wiring is still the same. It’s because you have each wire sticked and marked, it’s simply an issue of matching them up to the correct terminal. Step by step, link each wire to their suitable terminals and avail the labels you made previous. Ensure each one is locked tightly. Then put the wiring back to the wall and sometimes that can unbind a poorly locked wire.
Step 7 – Connect the new thermostat to the plate
When all the wires are linked, please connect the new thermostat to the wall mount and turn on the electricity. After that, check to ensure each function is working correctly. Otherwise, it’s likely a wire is not tight or is linked to the wrong terminal.
What are you looking for? Time to renew your old thermostat with a new one by studying our clear guidance.
You should know that even the most experienced people who relish DIY might come across troubles with wiring a thermostat. The major problem is that you need to deal with those different colored wires and know which one does what and if that were not enough, you should have letters and numbers to solve. However, with lots of thermostat on the market, people tend to be confused because they don’t know which system needs to equip a “c-wire”. In order to help you understand more, please take a look below now.


 RSS Feed
